Secret Management in .Net Core Application using Secret Manager and Azure Key Vault — PART 2

Title Image
In the 1st part of the series we have got our development practices organised so that we can keep our application secrets out of our code using secret manager. Secret manager is simple unencrypted mechanism just for use in development. Now here we will talk about getting into production environments, so we need to do something more robust. This is where key vault solutions comes in.
What is Key Vault?
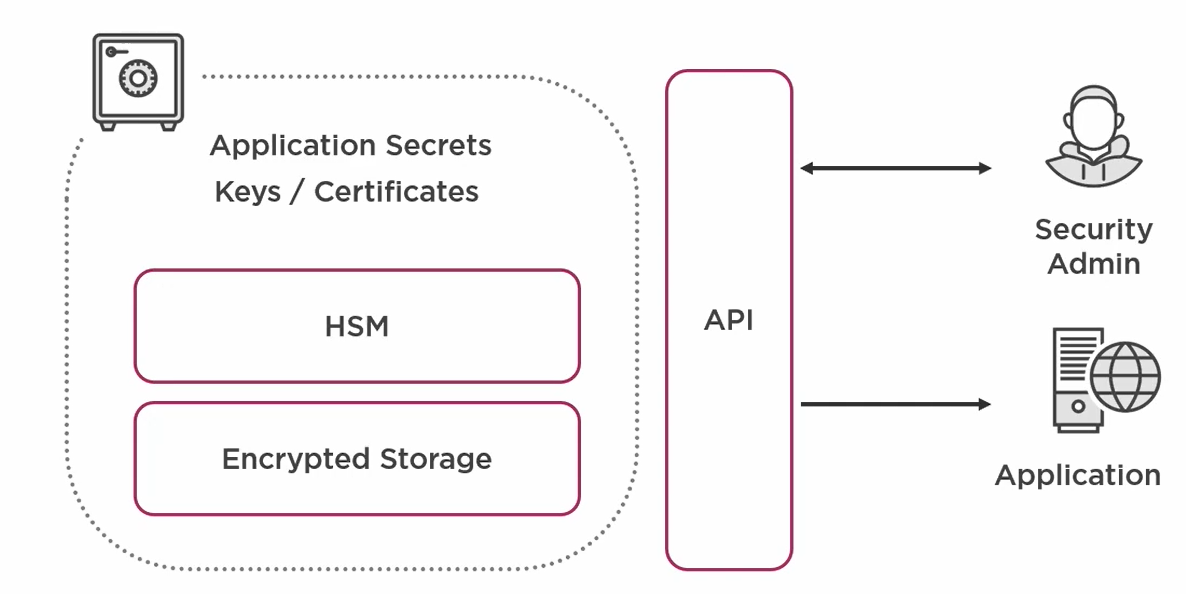
A Key Vault is is a management service for securing sensitive data which includes secrets and encryption keys. Everything is encrypted and key vault can be purely software based. Extra security can can be added by backing it with hardware security module which is dedicated physical computer device.

Access for management of keys and secrets are exposed by an API, which allow different level of access to items in the vault. Unlike secrets, encryption keys are never returned back to the requester. The key never leaves the key vault. So to make use of keys Key Vault will perform the encryption and decryption tasks.
Why use Key Vault?
- It provides the access control
- Help in implementing compliance requirements such as HIPPA, HITRUST, FIPS 140 etc
- Logging and Auditing while interaction with the vault
- Common approach across organization
Various options are available for key vault solution such as for cloud Azure Key Vault, Amazon Key Management Service, GCP Cloud KMS and for on-premise HashiCorp Vault are popular choice. Here will will discuss using Azure Key Vault but concepts are same for all other options as well.
In order to use Azure Key Vault we need to:
- Setup Azure Key Vault and add secrets
- Define authorization scheme
- Access secrets at runtime via configuration builder
As discussed in part 1 of this series we already have Secret Manager provider for development environment, but for production we need to add Azure Key Vault provider.
Setup Azure Key Vault
To use a key vault first we need to create a key vault to run and test the changes. First login into Azure portal @https://portal.azure.com and execute following steps:

- Create a new resource group. I have given name as “SecretManager-rg”, you can give any name to the resource group. Lets place it in default East US region. Then click on “Review + Create” to create a resource group.

2. Once the resource group is created, create a key vault by click “Add” button.

3. Select “Key Vault” in search area.

4. Click create button to create a new key vault

5. In create key vault screen select the resource group “SecretManager-rg”, provide the unique name for key vault name such as “secret-app1-dev” .

6. For pricing tier couple of options are available Standard and Premium. We will Standard but if you are looking for hardware security module then you should select Premium

7. We will keep rest of the settings as default move to next section which is Access Policy. Here we can define the identities that authenticate with the vault. We can change is later but by default all identities are added with full permissions.

8. You can restrict the network access to the vault by implementing networking policies. By default any authenticated connection from any network is allowed. But in production we have another layer of restriction and isolation by restricting access to any virtual network. Currently we will go ahead with default option.

9. Now we will move to review and create screen and once the validation is complete we create the vault

Now the key vault is created and available for use:

Isolated Environment
It is important to keep each environment isolated. To keep each environment isolated we need to have each environment its own key vault instance such as separate key vault for test, UAT and Production.
Also, each application must have its own separate instance too. This will protect against exposure of secrets because when assigning permission we cannot assign permissions to individual secrets which increase maintenance overhead. So, its about granting and denying permission to the vault itself.
Update .Net Core Application to use Key Vault
- First step is to add a nuget package to use Azure Key Vault configuration

- Select and install all the required dependencies

- Once the nuget packages are installed add the Azure key vault configuration to program.cs. We are using CreateDefaultBuilder helper method and we have to add more to it.

- We will update the code with ConfigureAppConfiguration extension method. It will give us access to configuration pipeline which already has default configuration. We will add the Azure Key Vault provider to the configuration. We will provide the vault name to the configuration and that what we need to do.

Above function internally use Azure Service Token Provider which is used to authenticate many Azure Resources and Azure Key Vault is one of them. It will do the automatic authentication with Visual Studio credentials, Azure CLI and Azure Managed Services. If you are using some other authentication mechanism then you need to write the code for that.
Adding Secrets to Key Vault
Now we will add the secrets to the vault. For that we will navigate to Secrets tab in vault settings

- Then we will click Generate/ Import button to add secret

- It will open Create a Secret screen. Get the name of connection string and add it to the Name field for Secret

- As we have discussed in previous blog colon (:) is used to define the hierarchy in configuration settings in .Net Core but Azure throws a validation error saying it not a valid key. So instead we will use two hyphens (- -) to denote it. The configuration provider in the app knows this and will interpret it accordingly.

- Now we will add the value of the key and click “Create”. There are other other options available but those are out of the scope of this discussion. For a brief introduction to them, Azure Key Vault has the ability to have multiple versions under each secret key allowing you to time the update with new value. We will take it up in module specific to key vault.

- Now when we go back to secrets tab inside vault we can see our connection string.

- If we want to see the value of secret we click the secret row and then click “Show Secret Value” button.

- Secrets are added so now run the application. When we run the application we will get big error.

This is because Azure Service Token Provider trying to authenticate and it has tried 3 different methods of authentication. For this we will authenticate with Azure CLI.
First we need to install the Azure CLI from Azure-CLI. Open the command prompt and type az. If we get following message that means Azure CLI is available on our machine

Now run “az login” command to authenticate through Azure CLI. Once authenticated it will store the token in operation system, we will close the command window and we will still be logged in.

It will open the azure portal screen in browser to login user credentials

Once we provide our Azure credentials we will get following message in command line

Now run the application again and we will not get that error any more.

Make Azure Key Vault implementation Production Ready
Now lets update the code so as to make it so as to make it production ready as we don’t want to use Key Vault in Development. We will make following guard clause implement this case.

Also, the hard coded key vault name is not good lets remove the hard coding and get it from configuration. We have access to default configuration providers, so if we build the configuration as it is we can configure new “KeyVaultName” setting. So when we deploy to production we just need to provide the “KeyVaultName”

Running Application in Azure
Now we will see how are application run in production environment. Here we will apply Managed Identities and Assign permissions in Key Valut.
Now the resource group SecretManager-rg represents the production view.

It contains Key Vault, App Service, DB Server and SQL Database. We will verify the Key Vault secrets have correct secrets defined.

As configured in Dev, Web App needs to contains a Appsetting “KeyVaultName” with the value of Key Vault Uri. To add it, go to:
- Configuration Tab of WebApp
- Click on New application setting
- Add Key as “KeyVaultName”
- Add Value as uri of Key Vault.
- Click Save

Now when we try to connect to the app we will see its failing:

If we check the logs it will show that error is because we can’t connect the Key Vault. Reason for this error is we have not assigned permissions yet.
To assign the permission first we need to create Principal for our WebApp. For that we will go to Identity Tab of Web App and Turn on the Managed Identity.

This will create the identity in Azure AD and assigned it to WebApp.

Now we can assign access to Key Vault. We go to Access Policies tab in SecretManagerVault and Add a new policy by clicking “+ Add New Policy”

To Add Policy
- First select “Get” and “List” Key Permissions, Secret Permissions and Certificate Permissions.

- Just to have separation of duties we will provide only read access. Here the List permission is granted because .Net Core will read all the secrets and add then to configuration. To do that it needs the list of all the keys.
- Now in Select Principal select new application principal. In my case its “ConsentManagementApp”

- Click Select. And then Click Add and Save


- Now we run the application and see its running

Now lets do the sanity check. Click on POST request and the “Try it out”.

Provide the required parameters and click execute. The application will return 201 created response.

Next test the Get API.

Now as we can see it return the same record. So our application is up and running and managing secrets in Azure Key Vault.
In the last part of this series we will see how Secret Management is done in CI/CD pipelines using Azure DevOps.
Originally published at https://gagan1983.medium.com on May 7, 2020.


